How to Install Vynix on Any Website
Vynix is a website annotation and developer-context tool for turning vague bug reports into usable engineering work. After you add its lightweight widget to a site, anyone with access can click the broken part of a page and capture the element, screenshot, console and network context, plus an AI diagnosis of the likely root cause.

What you are installing
Installing Vynix means adding a small widget to the website you want to review. The widget sits on top of the page so testers, product managers, designers, support staff, or developers can point at a problem instead of writing a long report from memory.
A typical bug report starts with something like, "The checkout button did not work for me." That sentence is not enough for a developer to act on. With Vynix, the person reporting the issue clicks the broken button or area, and Vynix captures the selected element, a screenshot, relevant console output, network context, and an AI diagnosis of the likely root cause. From there, the team can copy a ready-to-build prompt or open a GitHub issue and assign it to a coding agent.
The install is intentionally simple: place the widget on the pages where you want annotation and context capture. The exact place where you add it depends on how your site is built, but the goal is the same for every stack: load Vynix in the browser on the pages you want to inspect.
Before you add Vynix
Spend a few minutes deciding where Vynix should run. For many teams, the best first target is a staging site, preview deployment, or internal QA environment. That gives your team a safe place to test the widget, try a few annotations, and confirm that captured context is useful before you add it anywhere else.
You should also decide who should see the widget. Vynix is meant for people who are actively reviewing a site and reporting issues. On an internal app, that might be the whole team. On a public marketing site, you may only want it available in preview builds or behind whatever access controls your team already uses.
- Pick the environment first, such as local development, staging, preview, or production.
- Confirm that the people testing the widget can reproduce real issues on that environment.
- Decide whether the widget should load on every page or only on specific routes.
- Make sure your team knows where resulting prompts or GitHub issues should go.
- If your site has strict content security rules, be ready to update them according to the Vynix install instructions from your workspace.
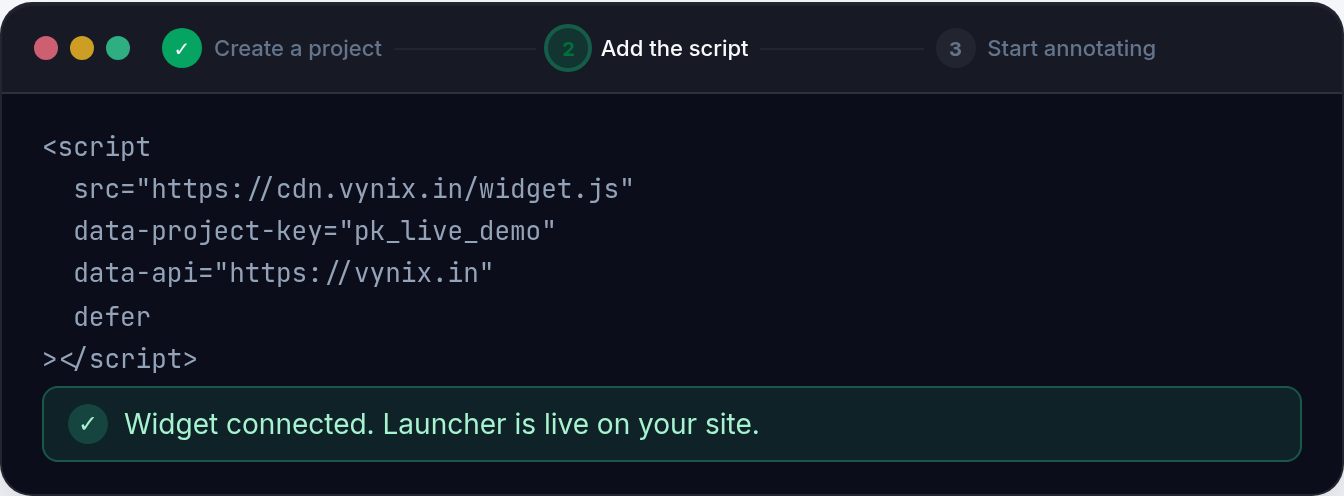
Install Vynix with a script snippet
The most direct way to install Vynix is to add the widget snippet from your Vynix workspace to your site template. In a traditional server-rendered site, that usually means pasting the snippet into the shared layout that wraps every page. In many apps, this is the file that contains the closing body tag or the common document shell.
Use the project-specific snippet provided by Vynix rather than copying one from another site. That snippet is what connects the widget to the correct Vynix project or workspace. If you use the wrong snippet, reports may be sent to the wrong place or may not work as expected.
After saving the change, deploy the site to the environment you selected. Open a page in the browser, refresh it, and look for the Vynix widget. If you do not see it, check the browser console first. A missing script, blocked request, typo in the snippet, or environment-specific template issue is usually easier to find there than by guessing.
- Copy the Vynix widget snippet from the correct Vynix project.
- Paste it into the shared layout or template for the pages you want to review.
- Deploy or restart the site, depending on your stack.
- Open the site in a browser and confirm that the widget appears.
- Create a test annotation so you know capture, diagnosis, and issue handoff are working.
Install Vynix in common website setups
Every website has a slightly different entry point, but Vynix fits the same pattern: load the widget in the browser. The main difference is where your app lets you add shared client-side scripts.
For a static site, add the snippet to the shared HTML template or layout used by your generator. For example, a documentation site may have a single base layout file that all pages inherit from. Add Vynix there if you want reviewers to annotate any page in the docs.
For a React, Vue, Svelte, or similar single-page app, add the snippet at the document or root layout level, not inside one small component that only appears on a few routes. If your framework has a recommended component for third-party scripts, use that approach so loading order and client-side behavior are handled correctly.
For a CMS-backed site, look for the area where your theme, template, or global header and footer scripts are managed. Some CMS installations expose this in the admin UI. Others require editing a theme file. If you use a tag manager, you may be able to add the Vynix snippet there, as long as it loads on the pages and environments you intend to review.
- Static sites: add Vynix to the base HTML layout.
- Single-page apps: add Vynix at the document or root layout level.
- Server-rendered apps: add Vynix to the shared page shell.
- CMS sites: add Vynix through the theme, global scripts area, or tag manager if your setup supports it.
- Preview deployments: include Vynix only when the preview environment is built, if that is how your team reviews changes.
Verify that Vynix captures useful context
Seeing the widget is only the first check. The real test is whether a report gives a developer enough context to take action. Pick a harmless issue on a test page, such as a misaligned label, a disabled button in a test flow, or a broken image in staging. Click the problem with Vynix and review what it captures.
A useful Vynix report should point to the selected element, include a screenshot, and show the browser context around the issue. If the bug involves a failed request, the network context can help show which call failed or behaved unexpectedly. If the bug involves client-side code, console output can help separate a CSS issue from a JavaScript error.
The AI diagnosis is not a replacement for engineering judgment. Treat it as a starting point. It can suggest the likely root cause and help shape the next step, but a developer should still inspect the relevant code and confirm the fix. The value is that the first investigation starts with evidence instead of a loose description.
Turn an annotation into engineering work
Once Vynix has captured the issue, decide how your team wants to act on it. If a developer is about to work on the fix directly, copying the ready-to-build prompt can be the fastest path. The prompt gives the coding agent or developer a clear description plus the captured page context, which is much better than starting with a blank issue.
If your team tracks work in GitHub, open a GitHub issue from Vynix and assign it to the right person or coding agent. This keeps the report in the same place as the rest of your engineering work. It also reduces the common problem where a bug is discussed in chat, half-fixed from memory, and then lost before anyone verifies it.
For best results, add a short human note before sending the issue if there is business context that the browser cannot know. For example, "This only blocks the enterprise signup flow" or "This copy was approved by legal and should not change." Vynix captures technical context, while your team can add the product context that affects the fix.
Keep the install clean over time
After Vynix is working, treat it like any other site integration. Keep the snippet in a predictable place, document which environments load it, and avoid scattering multiple copies across templates. A single shared install point is easier to review when your site structure changes.
If the widget stops appearing after a redesign or framework migration, check whether the shared layout changed. Teams often replace a document shell, move to a new app router, or split a monolith into smaller front ends and forget that shared scripts need to move too.
It is also worth reviewing access from time to time. If Vynix is only meant for internal review, make sure it is still limited to the right environments or user groups according to your own site controls. The widget is most useful when it is available to the people who report issues, without showing up where it does not belong.
- Store the snippet in one shared layout when possible.
- Document which environments load Vynix.
- Retest the widget after major frontend changes.
- Create a sample annotation after each install change.
- Remove duplicate or outdated snippets if your templates are reorganized.
- Install Vynix by adding its lightweight widget to the pages or environments where your team reviews issues.
- Start on staging or preview if you want to test annotation, screenshot, console, network, and AI diagnosis capture before broader use.
- Use Vynix reports to turn a clicked page problem into a ready-to-build prompt or a GitHub issue with useful developer context.
Frequently asked questions
Can I install Vynix on a staging site only?
Yes. A staging or preview environment is often the best first place to add Vynix. Add the widget only to that environment if that is where your team reviews and reports website issues.
Do I need to change my application code to use Vynix?
You need to add the Vynix widget to the pages you want to review. In most sites, that means adding the provided snippet to a shared template, layout, theme, or script manager. You do not need to rebuild your bug reporting process around it.
What does Vynix capture when someone reports an issue?
Vynix captures the clicked element, a screenshot, console and network context, and an AI diagnosis of the likely root cause. You can then copy a ready-to-build prompt or open a GitHub issue and assign it to a coding agent.
Install the widget with one script tag, point at a bug, and hand the fix to your coding agent.
Get started free